Transporting Your Vert Ramp in Perth

In many ideal scenarios you would generally decide on the final location you would like to setup your vert ramp long before you would physically build the structure. However, there are instances where you will need to move a ramp to a different location and some of those reasons include, selling your house and relocating, change of space requirements, selling the ramp or even moving it to an indoor skate park. All these are legitimate reasons why you would need to transport your vert ramp and exactly our situation moving from Wanneroo to Clarkson Skate Park in Perth.

However, moving a ramp is no easy feat, especially when it is already assembled. So here are a couple of options and some tips that will help you make the move of your ramp easier depending on how far you need to take it and what sort of budget you have in mind.

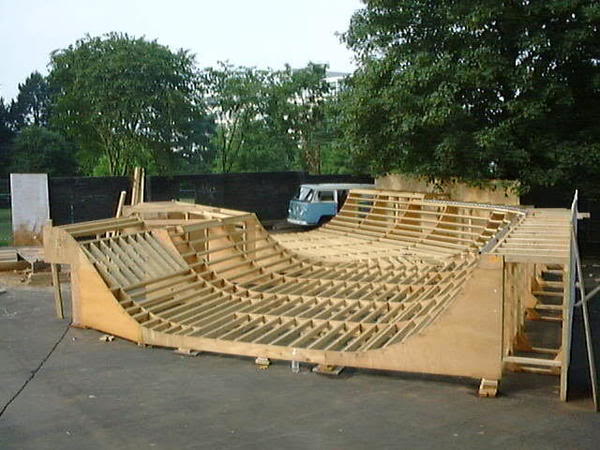
Option 1 –  Disassemble the whole ramp to transport

The less costly option of them all however the most time consuming is to disassemble the whole ramp into pieces and transport it together. The beauty of this option is it will cost you a lot less to hire removalists Perth with a decent size truck. With all the pieces disassembled, it won’t be as awkward and will definitely be a lot easier to carry and fit in the back of the truck ready for you to assemble at the other end. This is also the safest option compared to the following options as you will have to assemble it from scratch again you can ensure that all the structural components are joined on properly however transporting the ramp as one you may not know if the move of the ramp was compromised at all therefore you need to double check the structure before it can be safely used again.

Option2 – You can haul it

If you want the whole ramp to be transported at once without it be disassembled your only option is to hire a hauling truck that transport big pieces of cargo such as swimming pools, houses, and huge concrete slabs. Typically, these trucks are designed to haul oversize awkward items with the necessary equipment such as lifts and cranes to lift the item onto the truck. However, it’s not just the hauling truck that you will need to hire, you will typically need to hire a team of people, possibly a crane or lift specialist  in Perth to lift it onto the truck to get it ready for transport and there would usually be a couple of cars in front and behind the truck with flashing and hazard lights on warning other drivers that the item being transported is oversized. This maybe an expensive process.

Separating a ramp

Option 3 –  Separate it into 3 separate parts and transport

Depending on the size of your ramp you could even separate the ramp into 3 main sections to transport, effectively having 2 ends of the ramp and the bridge. This will make it smaller in size and easier to transport, you may not need such a large truck as well. Having the ramp in 3 sections will make transporting more stable as things tend to move and shake when transporting and having the ramp in smaller pieces will make it less likely to compromise the structure when moving about. Fortunately, in the main suburbs around Perth we have lots of smooth and sealed roads. Then at the end of the location all you have to do is join up the sections again.


Whichever option you choose, ensure you do it right and get professionals to help you rather than doing it yourself as injuries may occur. Good luck!

Read More >>

How Skateboarding Vertical Ramps Are Built

So, you want to build a Vert Ramp and you’re wondering where to start. Well, you’ve come to the right site. Just read on and find out how to go about it.

Step 1

You should first decide on the height and width of the Ramp you want to build. Have at least 4’ wide for the decks. You would want to make a whole size template of the quarter-pipe, which you’ll use in marking all of the end supports the equal size. In that case, 1/4″ plywood would work perfectly well for this. Cut scabs plates from 3/4″ ply at point where the seams join together and then hold the pieces together using 3/4″ wood screws. Rip one sheet to 23 and 3/4″ in order to get two rips out of one sheet. Cut 2 feet from one of the rips and then scab it to a full length piece so that you get a rectangle of 0.6m by 3.0m. Scab together a 5 foot square and then hook it to your rectangle. In that way, it will look like a giant boot. Into the top corner of 5 by 5 square, drive a nail. Remember the square is not connected to your rectangle. Use that nail as a pivot to mark the radius starting from the top corner up to the bottom corner and it should be directly below the nail. Use jigsaw to cut this radius out.

Step 2

You now need to make two end panels in every quarter-pipe using the template. To do that, simply use two layers of ¾ inch or 1.9 cm plywood that you’ll laminate together. To laminate the layers, you need to get wood glue and pour it into a paint tray. Using a roller, roll a thin layer of the glue over the whole surface of the bottom layer. Take the top layer and lay it down over the glue and make sure it turns the grain 90 degrees. Line up the edges and screw the two layers together. Leave it overnight and then use the template in marking out the end panels. Use a jigsaw to cut them out.

Step 3

Make the intermediate supports using your template. Use 2 by material to scab together the single layer 3/4″ ply. Ensure scab plates are approximately 2 inches in from edges.

Step 4

Cut many 2x4s into 3 feet and ensure they’re all cut to the same length. You can do that by use of a stop block set up.

Step 5

Flat edge of the 2x4s should now be lined up with the edge of your end panels and then nail them at the end panels just a few inches from each other. Use the same spacing to nail the other end to your intermediate panel. To nail the 2x4s easily, simply stagger them between intermediate panels. Use several intermediate panels until you get your desired overall length.

Step 6

You need to frame under the platform for supporting the weight of the user and during the landing. Anchor your framing to the ground to prevent it from tipping over.

Step 7

The last step is to install the riding surface. The best material to use here is 3/8 inch CDX plywood. In the same direction, run two layers and to break the seams, just run a full course across the full length. Now, you need to run a 2-foot rip along with the grain running similarly on the top. Finally, screw or nail it to the 2x4s. For more information about Ramp or Skateboard in general, always log in to our website or contact us at anytime.

Read More >>

Skateboarding In The Making

Skateboarding Australia is a blog setup to share all facets of skateboarding from Tips, Tricks, Events and even Competitions from all around the nation. Skateboarding has evolved over time since the early 1960s even though no one really knows who came up with the concept of building the very first skateboard but the very first concept of a rideable skateboard was attaching roller skate wheels to a plank of wood. Overtime materials for the deck and wheels have changed to provide more stability, control and traction with the use of fibreglass and aluminium. Then companies began to manufacture trucks or so called axles specifically designed for skateboarding to improve manoeuvrability. These such materials improved the overall handling of the skateboard so much that skateboarders were inventing new tricks and started to skate on different terrains such as the vertical wall of a swimming pool. However, many people could not afford to build their own vertical walls or have access to empty swimming pools and so the trend of skateboarding was more focused on street skating and flat ground tricks. Pushing street skaters to use obstacles around shopping centres and businesses. This however, drove a wedge between the skateboarding community and business owners alike arguing that skateboarding was damaging the private property of owners. However, more recently in early 2000 with the government acknowledge this to be a problem and came up with the solution to put funds towards plans to build safe recreational skateboarding parks with the intent to attract skateboarders towards a safe zoned area to skateboard driving skateboarders off the streets into a public and safer community further promoting the sport. Which leads us to skateboarding as we know it today, recognised as a sport in all over the world with its own competitions, sponsors and events indoor skate parks with over 4 metre high vert ramps.

Read More >>